The Machine is Built – Now Lets Set it Up!
If all went well with building the machine from my first post, you should have a functional system running on a bootable ProjectW iso. For the next steps we will cable up the controller and make some changes to ProjectW to send traffic across the switches.
The Router Analysis Reference SDN Controller Quick Setup Guide
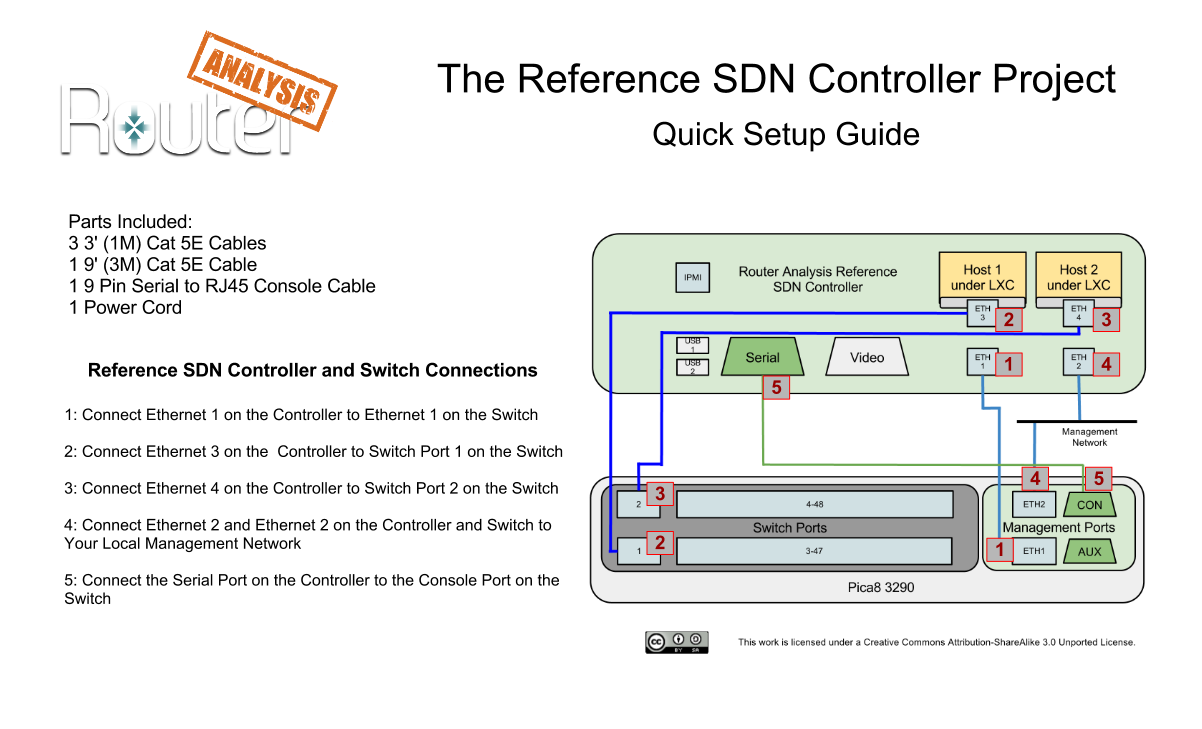
If you click on the page, it should expand if needed, go ahead and print it, do whatever you would like. This is the first revision of the document, essentially if you follow the directions here, all of the cabling should be correct when we reconfigure ProjectW.
Here is another picture of the actual devices with each spot labeled

Again, just connect each port to switch to the correct port on the controller and everything will work once we make the changes to ProjectW.
From an earlier post, I have copied the directions over:
Starting the Pronto
You will want to be on the console of the Pronto switch and tell it to use option 3 (boot to shell). Once you are at the shell you can then create a bootovs.sh like the one I show below:
bootovs.sh for the Pronto 3290:
MYIP=192.168.1.100

CTLIP=192.168.1.17

GWIP=192.168.1.1

DPPORTS=2

EP=ge

VSCTL="ovs-vsctl --db=tcp:$MYIP:9999"

cd /

ifconfig eth0 $MYIP netmask 255.255.255.0

route add -net default gw $GWIP

rm -f /ovs/ovs-vswitchd.conf.db

ovsdb-tool create /ovs/ovs-vswitchd.conf.db /ovs/bin/vswitch.ovsschema

ovsdb-server /ovs/ovs-vswitchd.conf.db --remote=ptcp:9999:$MYIP &

ovs-vswitchd tcp:$MYIP:9999 --pidfile=pica8 -- &

$VSCTL add-br switch1

$VSCTL set bridge switch1 datapath_type=pronto

for i in seq 1 $DPPORTS ; do

PORT=$EP-1/1/$i

$VSCTL add-port switch1 $PORT -- set Interface $PORT type=pronto $OPTS

done

$VSCTL set Bridge switch1 other-config:datapath-id=0000000000000099

$VSCTL set-controller switch1 tcp:$CTLIP:6633
I will go through this a bit, basically, we are setting up some static information such as the IP of the switch (192.168.1.100) the IP of the OpenFlow controller (192.168.1.17) and then starting OVS using that information on port 9999.
Put this script in your / directory. Then you can simply execute it and everything will work. I have defined 2 interfaces to be used, ge-1/1/1 and ge-1/1/2. You could define more. Also if you are using a 10G Pica8 switch, you can change the $EP variable to te.
The physical machine setup
Boot the machine using the projectwv04.iso and do the following:
Once the boot cd is up, do the following:
ifconfig eth0 192.168.1.17/24
You should now be able to ping 192.168.1.100 which is the pronto switch.
You will need to now run bootstrap-lxc.sh which will expand the lxc files onto the file system.
I have modified the config files for b1 and b2 in /var/lib/lxc/bx/config with the following for network:
/var/lib/lxc/b1/config
lxc.utsname = b1

lxc.network.type = phys

lxc.network.flags = up

lxc.network.name = eth0

lxc.network.link = eth2
/var/lib/lxc/b2/config
lxc.utsname = b2

lxc.network.type = phys

lxc.network.flags = up

lxc.network.name = eth0

lxc.network.link = eth3
Again, pretty simple stuff, I am simply telling the lxc containers to use physical intefaces eth2 and eth3.
for the projectw.sh script you need to change a few lines:
SWITCH1DPID=0x99

STARTBVMS=0
The first one defines the switches DPID which is in Hex, the second tells the system not to start the b1/b2 VMs.
Also you need to delete references to the b1 and b2 machines :
# lxc-stop -n b1 &> /dev/null;
# lxc-stop -n b2 &> /dev/null;
# rm -rf $LXCDIR/b1/rootfs/var/run/network/ifstate;
# rm -rf $LXCDIR/b2/rootfs/var/run/network/ifstate;
These lines will stop the projectw.sh from killing the b1/b2 machines and removing their network state.
At this point, you can run “projectw.sh –nox”. It will start up NOX, the RouteFlow processes and the VM running Quagga.
You will then need to start the b1/b2 LXCs by doing the following:
lxc-start -n b1 -d

lxc-start -n b2 -d
Now you should be able to attach to b1 “lxc-console -n b1” login root/root and ping 172.31.1.1 (router) and 172.31.2.2 (b2).
If you will want to ssh into the machine at some point, you will need to add a host key:
ssh-keygen -t dsa -f /etc/ssh/ssh_host_dsa_key
Hit enter twice and it will complete.
Summary
At this point you have a running testbed. The only issue is, if you reboot, power off, reset, crash or if anything else happens to the controller, you will have to start over with the modifications.
[…] With ONS around the corner, OpenSourceRouting a project under the Network Device Education Foundation, Inc, will be doing a demonstration involving the latest Reference SDN Controller. […]